
Creating a Comprehensive Kitchen Brief
Whether you are drawn to the sleek lines of a modern kitchen, the charm of a traditional space, or the simplicity of a minimalist approach, having a clear style in mind will streamline your decision-making process.
A well-defined kitchen brief stands as the cornerstone of any successful renovation or new build. This document serves as a detailed roadmap, meticulously translating a homeowner's vision, lifestyle, and practical needs into actionable specifications for design professionals. Without such a clear and comprehensive brief, projects are susceptible to miscommunication, budget overruns, and ultimately, a kitchen that falls short of expectations. The initial effort invested in this document ensures a cohesive understanding and alignment between the client and the design team from the very outset, paving the way for a more efficient and deeply satisfying outcome.
Before embarking on the intricate details of design and material selection, it is imperative for homeowners to engage in a thorough introspection regarding how their kitchen is currently utilized and, more critically, how they envision it functioning in the future. This involves a careful assessment of daily habits, specific cooking styles (e.g., frequent baking, gourmet meal preparation), entertaining frequency, and the unique dynamics of the household (e.g., accommodating multiple cooks, ensuring accessibility for children or elderly family members). Understanding these personal factors is paramount to designing a space that genuinely supports and enhances their lifestyle, rather than merely presenting an aesthetically pleasing but impractical environment.
The connection between a homeowner's lifestyle and subsequent design decisions is profound and dictates nearly every choice. For instance, a family with a passion for frequent baking will have distinct requirements for countertop materials, prioritizing features like heat resistance. Their appliance selection might lean towards convection ovens or double ovens to handle multiple baking tasks simultaneously. Furthermore, their storage solutions would need to incorporate specialized racks for baking sheets and ample space for ingredients. Conversely, a household that primarily reheats meals would have vastly different needs. Similarly, a client who frequently hosts large gatherings will place a higher emphasis on multi-functional spaces, open layouts that facilitate flow, and potentially a secondary preparation area to manage the demands of entertaining. A brief that merely lists desired features without articulating the underlying lifestyle needs that drive those desires will inevitably be less effective. The most impactful briefs narrate the story of how the kitchen will be lived in, fostering a design that is not just visually appealing but deeply integrated with the occupants' daily rhythms and aspirations.
II. Optimizing Workflow and Layout
Kitchen workflow refers to the efficiency and ease with which individuals move through the space while accomplishing various tasks. This encompasses a wide spectrum of activities, from the initial stages of meal preparation to the final steps of cleaning up, and even extends to how the kitchen accommodates social gatherings and entertaining. A well-optimized kitchen workflow ensures that the space operates with the precision of a "well-oiled machine," significantly reducing unnecessary steps, enhancing overall efficiency, improving safety, and ultimately making everyday tasks more enjoyable. Homeowners are encouraged to critically assess their existing kitchen habits, noting what aspects of their current layout work effectively and, more importantly, identifying areas that cause frustration. This includes observing where food preparation typically occurs, how movement flows (or is impeded) between different areas, and the accessibility of frequently used items.
The Classic Work Triangle and Modern Zoning Principles
The concept of the "work triangle" is a foundational principle in kitchen design, originating from efficiency studies in the 1940s by industrial psychologist and engineer Lillian Moller Gilbreth and popularized by researchers at the University of Illinois School of Architecture. This principle centers on the three most frequently used areas in a kitchen: the sink, the hob (stove/cooktop), and the refrigerator. The fundamental idea is to establish an imaginary, unobstructed triangular path between these three points, thereby facilitating smooth movement and minimizing wasted steps during meal preparation and cleanup.
For optimal functionality, specific dimensions are recommended for the work triangle. Each leg of the triangle should ideally measure between 4 feet (1.2 meters) and 9 feet (2.7 meters). The cumulative perimeter of all three sides should fall within the range of 13 feet (4 meters) to 26 feet (8 meters). Crucially, cabinets or other structural obstacles should not intersect any leg of this triangle by more than 12 inches (30 cm). Furthermore, major traffic patterns within the kitchen should ideally be routed to avoid crossing through the work triangle, and no full-height obstacle, such as a tall pantry cabinet, should be positioned between any two points of the triangle.
While the work triangle remains a valuable guideline for core cooking functions, contemporary kitchens have evolved into multi-functional spaces that often accommodate diverse activities and multiple users simultaneously. This shift has led to the adoption of more expansive "zoning" principles. These zones are designed to ensure a seamless flow of activities, encompassing various aspects of modern kitchen use:
Preparation Zone: This area typically integrates the refrigerator and pantry, providing ample counter space nearby for the convenient placement and preparation of ingredients.
Cooking Zone: Centered around the stove and oven, this zone should offer convenient storage for pots, pans, cooking utensils, and oven mitts, ensuring everything needed for cooking is within easy reach.
Cleaning Zone: This area is focused around the sink and dishwasher, with dishware, cutlery, and cleaning supplies strategically stored for immediate access during cleanup.
Storage Zone: Dedicated areas for food, cookware, and utensils are established, ideally positioned in close proximity to where these items are most frequently used.
Entertaining Zone: In kitchens featuring open layouts or integrated seating, this zone might include a breakfast bar or island. It is specifically designed to allow guests to socialize comfortably without impeding the cook's workflow or access to the primary work areas.
The evolution from the singular work triangle to integrated zones reflects a significant progression in kitchen design philosophy. The work triangle, rooted in early 20th-century efficiency studies, primarily aimed to optimize the workflow for a single cook. However, modern kitchens are increasingly multi-functional environments that often host multiple individuals cooking or performing different tasks concurrently. This necessitates a broader approach to zoning that extends beyond the simple triangular relationship. For instance, in single-wall kitchens, where a true work triangle is geometrically impossible, efficiency is still achieved through careful configuration of the primary elements and their proximity. For a comprehensive kitchen brief, clients should not merely define the work triangle but meticulously map out all their intended activities and how these activities flow between various zones. This approach, which considers multiple users and diverse functions, helps ensure the design supports the household's entire lifestyle, rather than being limited to a singular cooking process.
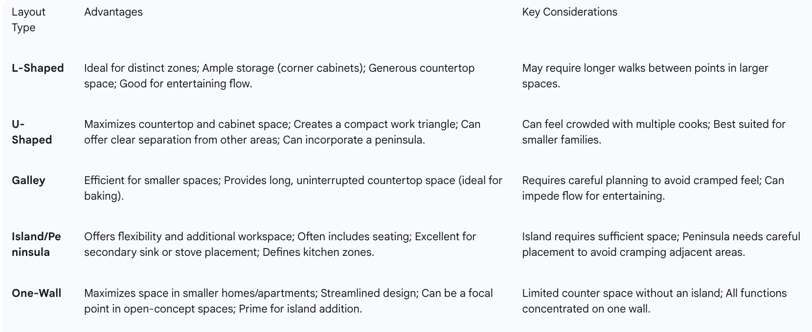
Common Kitchen Layouts: Advantages and Disadvantages
The overall shape and layout of a kitchen profoundly influence its workflow, efficiency, and how effectively space is utilized. Each common layout presents unique benefits and distinct challenges that must be carefully considered.
L-Shaped Kitchens: These layouts are highly effective for establishing distinct zones within the kitchen, which significantly aids in organizing different tasks and improving overall workflow. L-shaped designs typically offer ample storage space, particularly in corner cabinets, and provide a generous amount of continuous countertop area. This configuration is often a favorable choice for households that frequently entertain, as it allows for good flow and separation of activities.
U-Shaped Kitchens: Characterized by cabinetry and countertops along three walls, U-shaped kitchens are exceptional at maximizing both storage and countertop space. This layout is particularly adept at creating a compact and efficient work triangle, making it highly effective for meal preparation and other culinary tasks. Depending on the specific design, a U-shaped kitchen can also establish a clear separation between the kitchen area and other living spaces. A peninsula can often be incorporated into this layout to provide additional workspace or seating. While ideal for smaller families or one to two cooks, these kitchens can become crowded when multiple individuals are cooking due to the concentrated work zones.
Galley Kitchens: Well-suited for smaller or narrower spaces, galley kitchens feature two parallel lines of cabinets. This layout can be highly efficient for baking, as it often provides long, uninterrupted countertop space. However, careful planning is essential to prevent a cramped feeling and to ensure efficient movement, especially if the kitchen serves as a thoroughfare. The flow of people, particularly when entertaining, can be challenging in a galley kitchen.
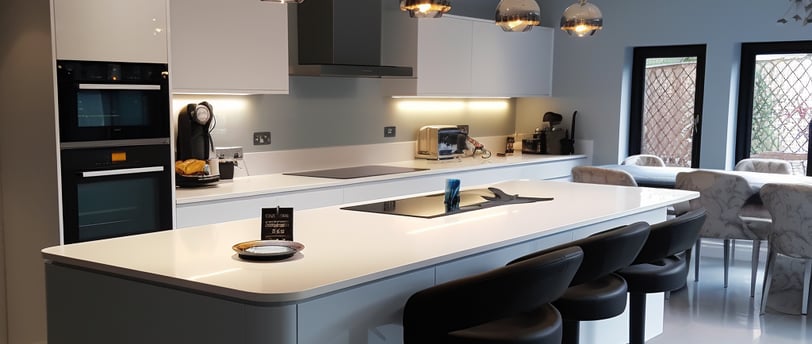
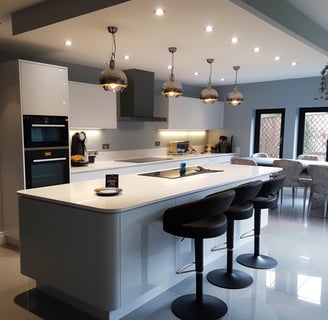
Island or Peninsula Layouts: These designs offer significant flexibility and additional workspace, making them perfect for larger kitchens where more counter space and versatility are desired. A kitchen island is a popular addition, providing much-needed prep space and often including a seating area for casual dining or socializing. Islands are excellent locations for incorporating a secondary sink or a cooktop, contributing to an ideal work triangle. A peninsula, which extends from a wall or existing cabinetry, can be integrated into L- or U-shaped layouts. It effectively separates the kitchen from dining or living spaces, creating a defined "kitchen zone," and often features seating. Peninsulas are a valuable alternative when there isn't sufficient room for a full island, but they require careful design to avoid making the adjacent workstation feel cramped.
One-Wall Kitchens: This layout is a popular choice for maximizing space in smaller homes and apartments, as all cabinets and appliances are concentrated on a single wall. This creates a streamlined and neat appearance, and in open-concept spaces, a one-wall kitchen can serve as a clean focal point. While counter space can be limited without additional elements, one-wall kitchens are prime candidates for incorporating a kitchen island in the center of the room, which can provide both extra functionality and a casual dining area.
The following table summarizes the advantages and key considerations for common kitchen layouts:
III. Materiality and Aesthetics
The selection of materials and the overarching aesthetic style are fundamental to creating a kitchen that is both visually appealing and deeply personal. These choices define the character of the space, influencing everything from its perceived warmth to its ease of maintenance.
Kitchen Aesthetic Styles and Characteristics
Kitchen design encompasses a diverse range of aesthetic styles, each with its own unique characteristics and appeal:
Traditional: This style draws its roots from 18th and 19th-century homes, characterized by a formal and often ornate appearance. Traditional kitchens frequently feature richly stained warm woods, raised panel cabinet doors, and classic hardware like knobs or cup pulls. The color palette typically leans towards warm neutrals or creams, serving as a backdrop for subtle pops of color in decorative accents or patterned floors. Architectural details such as coffered ceilings, intricate molding, columns, and wainscoting are prominent, lending a furniture-like quality to the cabinetry and creating a timeless, elegant atmosphere.
Modern: Modern kitchens prioritize a balance between form and function, emphasizing clean lines, minimalism, and simplicity. They often incorporate natural materials and focus on highly functional elements. This style is characterized by sleek and simple lines, minimalist light fixture accents, and streamlined cabinet designs, often featuring handle-less cabinets and concealed appliances. Modern kitchens can also feature bold and striking color schemes.
Farmhouse: The farmhouse aesthetic exudes rustic elegance and timeless charm, evoking the warmth of country living. This design philosophy seamlessly blends functionality with a comforting atmosphere. Key features include distressed wood, vintage-inspired fixtures, and a neutral color palette that lays the foundation for a cozy space. Farmhouse kitchens often embrace open shelving to display cherished items, a large farmhouse sink as a centerpiece, and classic cabinetry paired with natural materials like wood, stone, and metal, often distressed or antiqued for a rustic touch.
Industrial: Inspired by factories and warehouses, the industrial kitchen style emphasizes function, simplicity, and a rugged, unpolished look. It prominently features raw materials such as exposed brick or concrete, heavy-duty stainless steel appliances, and minimalist fixtures and finishes. Industrial kitchens often incorporate metal accents, mix-and-match shelving, and high-contrast details, with a typical dark monochrome palette punctuated by metallic shine or exposed pipes.
Transitional: This style skillfully bridges the gap between traditional and contemporary designs, offering a look that is both simple and relaxed. Transitional kitchens combine elements from both styles, such as warm natural finishes alongside sleek, uncluttered elegance. The design focuses on clean lines while subtly incorporating vintage-inspired light fixtures or decorative moldings to infuse character. Common elements include light, neutral color palettes, an abundance of cabinetry, stainless steel appliances, and modern lighting. Wood and stone are frequently used to provide texture, and black and brass finishes are popular accents.
Minimalist: A minimalistic kitchen aesthetic is a timeless pursuit of simplicity and refined functionality. This design philosophy embraces clean lines, a subdued color palette, and a deliberate reduction of unnecessary elements, aiming to create an uncluttered and serene ambiance. Handle-less cabinets and concealed appliances are key features that contribute to the seamless, unobtrusive aesthetic, with a careful selection of only essential items further enhancing the overall simplicity of the space.
Scandinavian: Scandinavian kitchens are renowned for their serene and minimalist style, prioritizing functionality to achieve an uncluttered and easy-to-maintain appearance. These kitchens feature practical layouts and efficient storage solutions to keep everything organized. They often incorporate smart appliances, undermount sinks, and pantries to enhance productivity. Visually, Scandinavian kitchens maintain a bright atmosphere by blending predominantly white surfaces with both natural and artificial lighting. They typically feature light wood accents and flooring, clutter-free countertops, and an open, airy layout. Materials are generally low-maintenance, such as quartz countertops, wood-look floors, and flat-panel cabinets, with soft touches like kitchen rugs adding a sense of "hygge" or coziness.
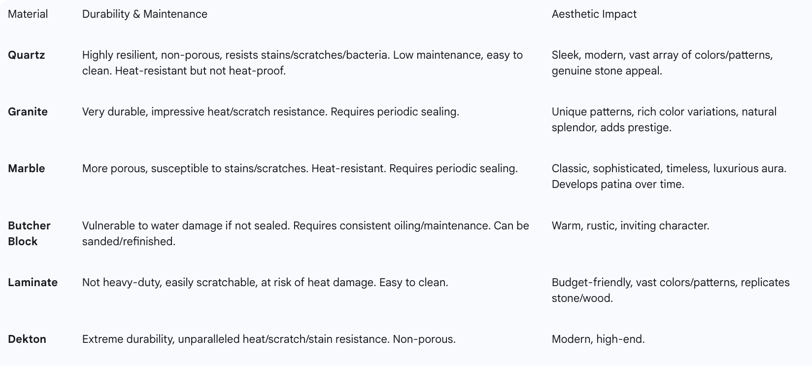
Countertops: Materials, Durability, and Maintenance
Kitchen countertops are pivotal in merging style with everyday utility, serving as primary work surfaces that endure significant wear and tear. The choice of material impacts durability, maintenance, and the overall aesthetic of the kitchen.
Quartz: Engineered from crushed stone and resin, quartz is a highly resilient and non-porous material. This composition makes it resistant to stains, scratches, and bacteria, making it a practical choice for busy kitchens. Available in a vast array of colors and patterns, quartz offers the luxurious appeal of genuine stone without the demanding upkeep often associated with natural stone. While it is heat-resistant, it is important to note that it is not entirely heat-proof. Maintenance is low, typically requiring only mild soap and water for cleaning, with toxic chemicals to be avoided.
Granite: A natural stone, granite is celebrated for its stability and impressive resistance to heat and scratches, making it a preferred choice for kitchens that experience daily use. Its unique patterns and rich color variations offer a one-of-a-kind look, adding prestige to a home. However, to preserve its beauty and longevity and to prevent stains, granite requires periodic sealing, typically every 6-12 months.
Marble: Marble countertops embody a classic and sophisticated aesthetic, imbuing kitchens with a sense of poise and timeless luxury. While heat-resistant, marble is more porous than other stone counterparts, making it more susceptible to stains and scratches. It is best suited for homeowners who appreciate the evolution of its patina over time. Maintenance involves using a stone-safe cleaner and resealing every 6-12 months.
Butcher Block: Made from wood, butcher block countertops bring warmth and a rustic touch to a kitchen, imparting a sense of natural warmth and inviting character. However, they are vulnerable to water damage if not meticulously sealed and require consistent oiling and ongoing maintenance to prevent drying and cracking. A unique advantage is their ability to be sanded and refinished, allowing for surface transformation over time.
Laminate: As a budget-friendly option, laminate countertops offer a vast palette of colors and patterns, artfully replicating the look of coveted stone or wood without the higher cost. While versatile in design, laminate is not as heavy-duty as natural stone and is easily scratchable and at risk of heat damage. Maintenance involves using non-abrasive cleaners to avoid scratches.
Dekton: This engineered material is a blend of raw materials used to produce porcelain, glass, and quartz work surfaces. Dekton is world-renowned for its extreme durability, offering unparalleled resistance to heat, scratches, and stains. Like quartz, it is a non-porous surface, making it invulnerable to water stains or damage.
The selection of countertop material is a critical decision that balances aesthetic preferences with practical considerations such as durability, maintenance, and budget. The table below provides a concise overview of common countertop materials:
Cabinetry: Materials, Door Styles, and Durability
Cabinetry represents the most significant portion of a kitchen renovation budget, typically accounting for 29% of the total cost. This is due to their central role as a primary fixture, their need for durability, and the homeowner's desire for updated styles and features. The choice of cabinet material and door style is deeply intertwined with the desired aesthetic and functional longevity of the kitchen.
Cabinet Materials:
Solid Wood: Materials like oak, maple, cherry, hickory, birch, and walnut are considered the gold standard for strength and longevity. Hardwood cabinets are durable, long-lasting, and can withstand heavy use, offering natural beauty and a wide range of stains and finishes. They are also non-toxic. However, they are more expensive and may warp over time in humid conditions. Regular dusting and occasional polishing with a gentle, wood-friendly cleaner are required for maintenance. Specific hardness ratings on the Janka scale include maple (1450), oak (1360), and birch (1260).
Wood Veneer: A more affordable alternative to solid wood, wood veneer cabinets offer a similar appearance. They consist of a thin slice of hardwood bonded to a less expensive material like plywood or particle board. Veneers are lighter than solid hardwood, reducing strain on hinges, but they can chip or peel over time and do not tolerate heavy wear as well as solid wood. Maintenance is similar to hardwood, requiring regular dusting and gentle cleaning.
Plywood: A budget-friendly option, plywood cabinets are resistant to dents and scratches. They are made from thin layers of wood (plies) glued together under heat and pressure, making them strong and resilient with better water resistance than many other materials. However, they are not as durable as hardwood, and if they come with a veneer finish, it can peel or chip. Cleaning involves wiping with a damp cloth and mild detergent, avoiding excessive water.
Thermofoil: Popular for their sleek, modern appearance, thermofoil cabinets stand up well against water spills and scratches. They are made of a vinyl laminate heated and molded over medium-density fiberboard (MDF) or engineered wood. Thermofoil cabinets are inexpensive, easy to clean, and available in various colors and finishes. Their main drawbacks are susceptibility to heat damage and difficulty in repairing chips. They should be cleaned with mild detergent and water, avoiding abrasive cleaners.
Laminate: A popular choice for budget-conscious homeowners seeking durability, laminate cabinets are synthetic materials made of layers of paper and plastic resin fused under high pressure. They are inexpensive, durable, and available in a wide variety of colors and finishes. However, they are not as durable as wood or plywood and cannot be repaired once damaged. Cleaning requires mild soap and water, avoiding abrasive cleaners.
Particleboard: An economical choice, particleboard cabinets are made of wood chips, sawdust, and resin bonded together. They are lightweight and inexpensive but significantly less durable than other materials and highly susceptible to water damage.
Textured Melamine (Thermally Fused Laminate): This is one of the most durable cabinet materials, known for its strong resistance to excessive moisture, heat, and stains. Melamine boards are designed to replicate the look and feel of realistic paint, wood grain, concrete, or metal designs, consisting of a raw particleboard substrate with resin-infused decorative paper fused to both sides.
Painted Cabinets: While painted cabinets can last a long time, they are susceptible to chips and scratches. If applied to natural wood, which "breathes" (expands and contracts), paint can show separation on the joints of 5-piece doors. Using MDF doors can prevent this as MDF is an engineered product and does not undergo natural breathing. However, MDF's underlying substrate is vulnerable to water damage if exposed.
Stained Cabinets: A stained finish can enhance the durability of robust wood species like oak or maple, providing a lasting aesthetic.
Cabinet Door Styles:
The choice of cabinet door style significantly impacts the kitchen's overall aesthetic and can define its character:
Shaker: The most common door style today, Shaker cabinets feature a five-piece flat-panel design with simple, clean lines. Their versatility allows them to blend with almost any decor, from contemporary to traditional, depending on the wood species, stains, paint colors, and hardware chosen. This classic style can also fit various budgets.
Flat Panel (Recessed Panel/Slab): This door style offers a clean look with minimal detailing. It can be paired with inset styling for added character without overwhelming the space. Flat panel designs are increasingly popular in painted cabinetry and serve as a clean template for modern, contemporary, mid-century, and European designs. A significant advantage is their ease of cleaning.
Raised Panel: These doors add dimension to cabinetry design with a center panel that is raised from the rest of the door, often featuring various profiles from simple to complex. They are well-suited for more formal or traditional settings and can make the cabinetry a focal point.
Inset: Inset cabinet doors fit precisely inside the cabinet frame, offering a refined and polished, high-end look. This style is one of the most expensive due to the precise measurements required for proper fit and operation, even with wood expansion. Hinges can be exposed or hidden for a furniture-like appearance.
Glass-Front, Mullion, or Open Frame: These styles incorporate glass panes, allowing for visual openness and the display of dishware. They are particularly effective in smaller kitchens, creating an illusion of more space and contributing to a light and airy feel.
Distressed or Glazed: Ideal for achieving an antique or vintage-style kitchen, these cabinets feature dark glazes applied and wiped off to highlight details in profiles and moldings. Painted brush strokes or wire brushing techniques can add a craftsman-made or unique textured look. This customization typically incurs an additional cost.
Beadboard: This style evokes a cottage chic aesthetic, with a center panel designed to resemble traditional beadboard paneling. It adds texture and is popular in coastal or country-style kitchens.
Thermofoil, Melamine, and Laminate (European Style): These are typically flat-panel or slab doors, simple in design with minimal ornamentation beyond hardware. They are often constructed from MDF or plywood bases and heat-sealed with various finishes, offering endless versatility in appearance.
Arched or Cathedral: These door styles feature a half-oval or medieval arch shape at the top of the raised panel, often used in more formal kitchen designs. Their curves soften the overall look, adding an element of graceful sophistication and a dramatic touch.
The interplay between the chosen aesthetic and material choice for cabinetry is critical. For instance, solid wood with raised panels naturally complements a traditional kitchen, while thermofoil or laminate with slab doors aligns seamlessly with a modern or minimalist aesthetic. This means the kitchen brief must articulate a cohesive design vision where material selections reinforce the chosen style, rather than being disparate decisions. A well-considered brief ensures that every element, from the cabinet material to the door style, contributes to a unified and functional kitchen environment.
Flooring: Options, Durability, and Maintenance
Kitchen flooring must strike a delicate balance between resilience and aesthetic appeal, as this area experiences more wear and tear, spills, and dropped items than most other rooms in a home. The choice of flooring impacts comfort, safety, and long-term maintenance requirements.
Porcelain and Ceramic Tile: These tiles are highly recommended for kitchen floors due to their inherent hardness and resistance to moisture. They offer an extensive range of styles, colors, and patterns, allowing for significant customization to match the kitchen's aesthetic. While durable and heat-resistant, tiles can feel cold underfoot and may be slippery when wet, although textured finishes can be chosen to improve grip. Maintenance is generally easy, involving daily sweeping or vacuuming and occasional mopping with a mild cleaning solution.
Natural Stone (Granite, Marble, Slate): Natural stone, such as granite, marble, and slate, adds a unique and luxurious beauty to a kitchen. These materials are naturally durable and resistant to scratches and heat. However, they typically require more maintenance to preserve their appearance and must be sealed after installation and re-sealed regularly thereafter to prevent stains. While water-resistant, prompt cleanup of spills is necessary.
Luxury Vinyl (LVT/LVP): For those who prefer a softer, warmer feel underfoot, luxury vinyl is an excellent choice. It effectively replicates the look of natural materials like wood and stone but offers superior resistance to kitchen spills and accidents. Luxury vinyl is highly durable, resistant to stains and scratches, and completely waterproof, meaning spills can be easily wiped up without damage. It is also more comfortable to stand on for extended periods, making it ideal for busy kitchens. While flame resistant, it can be damaged by extremely hot items dropped directly on its surface.
Concrete: Concrete flooring is exceptionally strong and resistant to scratches or chips. When properly installed and maintained, it can last for an incredibly long time and withstand very high temperatures without damage. To maintain its protective top layer, concrete floors require sealing every one to three years, depending on wear and tear. Regular cleaning involves mopping with a neutral cleaning solution. It is crucial to have concrete floors professionally sealed to ensure they are fully waterproof.
Linoleum: Linoleum flooring is a long-lasting and versatile option that can withstand heavy foot traffic. It is softer than most flooring materials, providing more comfort underfoot, and comes in a large variety of colors and designs. Made from all-natural materials, it is highly resistant to heat and repels dirt and dust, making it easy to keep clean with regular dusting/sweeping and occasional damp mopping. While generally water-resistant, some types are more susceptible to water exposure, which can cause permanent damage, so sealing is recommended.
Laminate: Designed for durability, laminate flooring consists of multiple layers laminated together, typically with a high-density wood fiberboard core. It can effectively imitate the look of more expensive flooring materials like stone, tile, or wood. While the core is largely impervious to heat, the plastic top layer may melt under extreme heat. A significant drawback is that laminate flooring is not water-resistant; excess water from spills or cleaning can cause the material to warp or stain, especially near seams or edges.
Hardwood: The durability of hardwood flooring varies depending on the specific type (engineered, prefinished, unfinished, or reclaimed). Hardwoods are affected by changes in temperature and humidity, with low humidity causing them to shrink and warp. Proper installation and sealing are crucial for maintenance, which includes daily sweeping and occasional damp mopping with a hardwood cleaner. While not waterproof, properly sealed hardwoods can be water-resistant to minor spills if cleaned promptly. It is important to avoid placing hot items directly on hardwood floors to prevent scorch marks or fire hazards.
The choice of kitchen flooring is a significant decision that requires balancing aesthetic appeal with practical considerations. The floor should complement the kitchen's overall design and contribute to a warm, inviting atmosphere. This involves considering color, pattern, texture, and compatibility with cabinetry and fixtures. The decision should also align with the homeowner's lifestyle (e.g., families with children or pets may prioritize spill resistance and ease of cleaning) and a realistic assessment of willingness to perform ongoing maintenance.
Splashbacks: Materials and Characteristics
Kitchen splashbacks, or backsplashes, serve a dual purpose: protecting walls from splashes and spills, and offering a significant opportunity for creative expression and aesthetic enhancement. They can introduce color, texture, and become a focal point of the design.
Stone: Stone splashbacks offer a timeless and luxurious look, often seamlessly extending from the countertop to create a unified surface. Materials like marble, Corian, or Caesarstone can be used to create a calm atmosphere with neutral tones and subtle textures.
Mirror: A favored design technique, mirrored splashbacks reflect light, making a room appear larger and brighter. They can capture reflections of outdoor views or interior vignettes, visually extending the space and doubling the effect of textural accents.
Tiles: Tiles provide endless options in materials (marble, porcelain, ceramic, glass mosaic), sizes, patterns, and colors. Popular shapes include subway tiles, as well as square, rectangular, or geometric designs. While hard-wearing, the grout may require some maintenance over time. The myriad of laying patterns allows for unique individuality.
Brick: For an industrial warehouse or rustic look, brick splashbacks are a timeless and hard-wearing option that can seamlessly integrate with existing themes. Brick is experiencing a renaissance and lends itself to various interior design styles, from contemporary to classic.
Stainless Steel: Moving beyond its industrial connotations, stainless steel is embraced in modern kitchens for its extreme hardiness. It reflects light like a mirror and is durable, providing a robust edge to kitchen décor without needing frequent replacement. While durable, it tends to show smears and fingerprints.
Glass (Window): Installing a glass window as a splashback can create a picturesque view from the kitchen, effectively flooding the space with natural light and connecting the interior with nature. This can introduce vibrant outdoor tones into the kitchen's color palette.
Acrylic: Acrylic splashbacks are fully customizable, available in a virtually unlimited range of colors and sizes. They are a versatile, lightweight, and cost-effective option. However, they have low heat resistance, requiring care when placed near a hob.
Metals (Brass, Bronze, Copper): Metals such as brass, bronze, and copper can make a bold and beautiful statement, adding a "wow factor" and sophisticated texture to the kitchen.
Original Artwork: For those with a passion for art and a flexible budget, commissioning an original artwork for a splashback can create a truly unique focal point that inspires the entire decorating palette of the room.
IV. Appliances, Plumbing, and Utilities
The selection and integration of appliances, plumbing, and utilities are fundamental to the functionality and efficiency of any kitchen. These elements are not merely additions but integral components that must be planned meticulously to ensure seamless operation and adherence to safety standards.
Essential and Optional Appliances: Types, Sizes, and Features
Appliances form the core of kitchen functionality, and their selection should align with cooking needs, habits, and the kitchen's aesthetic.
Essential Appliances:
Refrigerator: A critical appliance for food storage, modern refrigerators offer features such as adjustable shelving and drawers, humidity-controlled crisper drawers to keep produce fresh, triple-tech cooling systems, super-freezing and cooling functions, and door alarms to maintain cold air. Many models include integrated water filters and showcase LED lighting. Counter-depth designs are popular for maximizing space. Smart refrigerators can offer advanced features like built-in cameras to check contents remotely, recipe recommendations based on ingredients, and expiration tracking. It is important to note that appliance size matters significantly for compatibility with existing space, especially in older homes where smaller, more compact models might be necessary, though these may offer fewer features.
Range/Oven: This category includes gas, electric, induction, and dual-fuel options, each offering distinct cooking characteristics. Gas ranges provide instant flame adjustment, while electric ranges offer consistent dry heat. Induction ranges provide exceptional temperature control and ease of cleaning, while dual-fuel combines gas cooktops with electric ovens. Key features include convection settings for faster, more even cooking, self-cleaning functions (using steam or high heat), and smart options that allow remote control via smartphone apps, automatic adjustment of settings, and even built-in cameras to monitor food. Double ovens provide increased capacity and flexibility for cooking multiple dishes at different temperatures. Ranges come in various sizes (e.g., 30-inch, 36-inch, compact, commercial-style) to suit kitchen dimensions and cooking needs. Placement should be near the food preparation and cleaning zones for optimal workflow.
Dishwasher: Dishwashers save considerable time and effort in cleanup. Available in various sizes, they often feature adjustable racks, energy-efficient or sanitizing cycles, and smart wash systems that sense load size and dirtiness to optimize water usage. Many models are designed for quiet operation and may include a third shelf specifically for silverware and serveware.
Microwave: Beyond traditional countertop models, built-in microwave speed ovens are popular for saving counter space. These sophisticated units may offer multiple power levels, air fry functions, sensor menu functions, and can be installed as drawer models for easy top access. Some smart microwaves feature "Scan-to-Cook" technology.
Optional and Specialized Appliances:
Beyond the essentials, a range of optional appliances can enhance kitchen functionality:
Countertop Appliances: Toasters, countertop ovens (for additional baking/broiling space), blenders, food processors (versatile for chopping, kneading, shredding), coffee makers, slow cookers, stand mixers (especially for baking), and immersion blenders.
Specialty Cookers: Rice cookers, griddles, pressure cookers, electric kettles, deep fryers, waffle irons, bread machines, and pasta makers.
Smart Kitchen Gadgets: Smart meat thermometers (connect to phone for temperature monitoring), smart sous vide cookers (precise temperature control via phone), and smart kitchen scales (accurate measurements, nutritional info, recipe recommendations).
The selection of appliances is not an isolated decision; it significantly influences kitchen workflow, energy efficiency, and the necessary electrical and plumbing infrastructure. For example, the placement of a dishwasher should ideally be near the sink in the cleaning zone. Investing in Energy Star rated appliances can reduce utility bills and environmental impact. The kitchen brief must detail the intended use and desired features of all appliances to ensure compatibility with the design and optimal functionality within the space.
Plumbing Fixtures: Sinks, Faucets, and Specialized Additions
Plumbing decisions are critical and must be made early in the design process to avoid costly modifications and delays once walls, ceilings, and floors are finished, and cabinets are installed.
Sinks:
Kitchen sinks come in various mounting styles and materials, each with distinct features:
Mounting Styles:
Drop-in Sinks: Installed from above the countertop.
Undermount Sinks: Mounted beneath the countertop for a sleek, seamless look.
Farmhouse Sinks (Apron Sinks): Feature a wide, deep bowl with an exposed front, ideal for cleaning large items. They typically require a specific base cabinet for support.
Types: Standard single or double basins, bar sinks (smaller footprint for secondary use), and all-in-one sinks (including faucet, sprayer, soap pump, and prep surface).
Materials:
Stainless Steel: Most common, affordable, versatile, and durable. Easy to clean but can dent, scratch, and show water spots. Higher quality is 16-18 gauge.
Fireclay: Crafted from clay and baked at high temperatures, glazed with porcelain enamel. Very heavy, requires custom installation, but resistant to fading and rust with minimal maintenance.
Porcelain: A mixture of clay and minerals, non-porous and low-maintenance. Can be molded around a metal core for durability, but more prone to scratches and chips than fireclay.
Granite Composite: A blend of granite dust and acrylic resins, resulting in a uniform color. Very durable, long-lasting, and resistant to chips, scratches, and stains. Can shatter fragile dishes if dropped. Requires specific cleaning solutions.
Cast Iron: Made entirely of cast iron with a porcelain enamel overlay. Resilient and stain-resistant, available in custom colors. The enamel can chip, exposing the rust-susceptible iron layer. Heavy, increasing installation costs.
Enameled Steel: Lighter than cast iron, easier to install. Steel core with porcelain enamel coating makes it scratch-, heat-, and stain-resistant, adapting well to various styles.
Copper: A naturally anti-microbial material that can eliminate bacteria and viruses. Highly durable and can last generations, but requires specific maintenance to preserve its finish. More expensive, offering a warm, rustic metallic alternative.
Features: Vibration-damping foam insulation, brushed satin finishes to hide water spots, and various corner radii (standard, tight, zero).
Faucets:
Kitchen faucets come in a wide array of styles and features, balancing aesthetics with functionality:
Types:
Single-Handle: One lever controls flow and temperature, sleek and space-saving, ideal for minimalist designs.
Double-Handle: Separate handles for hot and cold, offering precise temperature control and a classic/vintage look.
Pull-Down: Spray head pulls straight down into the sink, best for deep sinks, useful for washing produce, filling pots, or cleaning.
Pull-Out: Spray head slides out towards the user, ideal for shallower sinks or precise water flow direction.
Touchless: Motion sensors activate water flow, offering improved hygiene, water conservation (automatic shut-off), and ease of use. Adds a high-tech appeal but has a higher initial cost and requires a power source.
Commercial-Style: Inspired by professional kitchens, larger and more powerful with flexible spring coils, built for intense use.
Features: Magnetic docking spray heads (securely lock in place), multiple spray modes (stream, spray, pause), ceramic disc valves (prevent leaks, smooth operation), temperature memory (remembers last used setting), high-arc spouts (ample space for large pots), and touch/voice activation for advanced control.
Finishes: Common options include polished chrome, matte black, brushed nickel, bronze, gold, oil-rubbed bronze, and aged brass. Dual-tone combinations are also available.
Mechanisms: Cartridge (smooth, robust), compression (older, leak-prone), and ball designs (single-handle, may require frequent repairs).
Spout Height and Reach: These factors influence both mechanics and style; taller spouts suit deep sinks, while shorter ones fit compact spaces. Water-saving technologies like WaterSense certification are also important considerations.
Specialized Additions:
Pot Fillers: A specialized faucet installed above the stove, designed to fill large pots directly at the cooktop, eliminating the need to carry heavy, water-filled pots from the sink. Pot fillers feature an extendable arm that swivels out and folds back, offering immense convenience, reducing physical strain, and preventing spills. They also serve as a stunning design statement, available in various styles and finishes to complement any kitchen aesthetic. Installation costs can be significant, especially if new plumbing lines are required behind the cooktop, and consistent maintenance is necessary.
Other Additions: Garbage disposals and on-demand water filtration systems can further simplify daily cooking and cleaning tasks.
The early determination of plumbing needs is paramount. The kitchen brief should meticulously detail all desired water points and fixture types, from the main sink to any auxiliary prep sinks or pot fillers. This proactive planning prevents costly modifications and ensures that the plumbing infrastructure supports the full functionality of the envisioned kitchen.
Ventilation Systems: Types, CFM Requirements, and Maintenance
A robust ventilation system is crucial for maintaining a healthy and comfortable kitchen environment. It actively removes cooking heat, effluent, and odors, preventing grease buildup (which can be a fire hazard), inhibiting mold growth, and averting the backdrafting of harmful gases like carbon monoxide into the home.
Types of Ventilation Systems:
Type I (Grease Rated) Hoods: These are specifically designed for placement over grease-producing appliances such as ranges, griddles, fryers, and charbroilers.
Type II (Vapor Hoods): Also known as vapor hoods, these units are designated to handle heat and steam from appliances like dishwashers and certain oven types where grease is not the primary concern.
Ducted Hoods: The most common and effective type for residential kitchens, ducted hoods vent air directly outdoors, removing smoke, grease, and odors entirely from the home.
Ductless Hoods: These systems do not require connection to external ductwork. Instead, they filter out contaminants using a special charcoal filter and recirculate the cleaned air back into the kitchen. Ductless hoods are easy to set up and offer flexible placement options.
Downdraft Ventilation Systems: Integrated into the cooktop or counter, these systems draw air downward through a vent. They provide a sleek and unobtrusive solution, ideal for kitchens with islands or where overhead ventilation is impractical. However, some models may affect the flame on gas stove burners, may not be ideal for tall pots or intense cooking sessions, and can limit cabinet storage beneath the cooktop.
Mounting Styles: Ventilation systems are available as wall-mounted hoods, under-cabinet hoods, and island-style hoods.
CFM (Cubic Feet per Minute) Requirements:
CFM is a measurement of air movement, indicating how many cubic feet of air a range hood moves per minute at its highest speed. A higher CFM generally signifies a faster ventilation rate. Determining the appropriate CFM is crucial to avoid issues like unnecessary energy use or, critically, backdrafting of harmful gases from combustion appliances due to an overpowered hood.
Guidelines for calculating ideal CFM include:
Kitchen Size: A general rule of thumb is to provide 1 CFM per square foot of kitchen space (e.g., a 200 sq. ft. kitchen would need a 200 CFM range hood). Alternatively, the hood should refresh the air 15 times per hour. This can be calculated by multiplying the kitchen's length, width, and height to get cubic feet, then multiplying by 15, and dividing by 60 minutes (e.g., a 12 ft x 15 ft x 10 ft kitchen needs approximately 450 CFM).
Stove Type: For electric stoves, multiply the stove width by 10 (e.g., a 30-inch electric stove needs 300 CFM). For gas stoves, add up the BTU output of all burners and divide by 100 (e.g., a stove with 40,000 BTUs requires at least 400 CFM).
Ductwork Length and Design: Longer or more complex ductwork, especially with multiple bends or narrow sections, can restrict airflow. A higher CFM range hood may be necessary to compensate for these challenges.
Cooking Style: Different cooking habits require varying CFM. Light cooking (boiling, baking) may suffice with 260-300 CFM. Moderate cooking (sautéing, stir-frying) typically needs around 400 CFM. Heavy cooking (frying, grilling, wok cooking) necessitates a 600+ CFM hood for maximum airflow.
Mounting Height: If the range hood is more than 3 feet above the stovetop, a higher CFM model might be required for effective contaminant removal.
It is generally advisable to choose the higher of the calculated CFM values. A higher-CFM range hood offers more versatility, as it can be adjusted to run at lower speeds, whereas a lower CFM fan cannot be made to go faster. For gas ranges, a higher CFM is more efficient at removing fumes and cooking byproducts.
Maintenance:
Ventilation systems require consistent maintenance to ensure optimal performance and safety. Professional cleaning is recommended at a minimum of every six months. Filters, which are typically visible, should be removed and run through a dishwasher weekly. If the ventilation system is not operating correctly, or if there is a noticeable vibration or excessive noise, a service technician should be contacted immediately, as these can indicate issues like unbalanced or dirty fans.
Code Requirements:
Building codes mandate mechanical ventilation systems in kitchens that vent air directly outside, unless the hood is specifically designed for recirculation and includes proper filters. Minimum duct sizes are specified: 6-inch diameter for systems up to 400 CFM and 8-inch diameter for systems exceeding 400 CFM. Ducts must be smooth metal to reduce resistance and prevent grease buildup. Additionally, if a system exceeds 400 CFM, a makeup air system is required to replace the exhausted air, preventing negative pressure that could pull dangerous gases back into the home.
Electrical Considerations: Outlets, Circuits, and Safety
The kitchen is often referred to as the "powerhouse of the home" due to the high demand for electricity from numerous appliances. Meticulous electrical planning is essential to prevent issues such as overloaded circuit breakers, damaged appliances, or even electrical fires, thereby ensuring the kitchen is both safe and highly functional.
Outlets and GFCI Protection:
Small Appliance Circuits: The National Electrical Code (NEC) mandates at least two 20-amp, 120-volt circuits specifically dedicated to countertop and eating area outlets. These circuits are crucial for powering small appliances like toasters, blenders, and slow cookers without overloading the system.
Strategic Placement: Outlets must be strategically placed to ensure accessibility and prevent clutter. No point along the countertop should be more than four feet from an outlet, and outlets should be installed no more than twenty inches above the countertop to keep cords tidy. Islands and peninsulas with a countertop area of 24 by 12 inches or more must have at least one outlet.
GFCI Protection: All outlets serving countertop surfaces in the kitchen, particularly those within six feet of a sink, must be equipped with Ground Fault Circuit Interrupter (GFCI) protection. GFCIs are vital safety devices that detect imbalances in electrical flow and instantly shut off power to prevent electrical shocks in wet environments.
Tamper-Resistant (TR) Outlets: For enhanced child safety, the NEC now requires tamper-resistant (TR) outlets for all 15- and 20-amp receptacles in kitchens, including those on countertops, walls, and hallways. These outlets feature built-in shutters that block anything other than a proper plug.
USB Charging Ports: Many modern kitchens benefit from outlets with built-in USB ports for convenient charging of phones, tablets, and other devices without occupying traditional outlets.
Dedicated Circuits for Major Appliances:
The NEC requires dedicated circuits for power-hungry appliances to handle their specific electrical demands and prevent system overloads :
Dishwasher: Typically requires a GFCI-protected, 15-amp, 120-volt circuit, wired with 14/2 cable. The circuit and wiring must match the model's power requirements if higher.
Microwave: Needs a dedicated 20-amp, 120-volt circuit wired with 12/2 cable, as microwaves are known to trip shared breakers.
Electric Range: Demands a substantial 50-amp, 120/240-volt circuit due to its high energy consumption. Proper wiring is essential, though GFCI protection is not typically required. Some units may require circuits as large as 60 amps, while smaller units may need 30- or 40-amp circuits.
Garbage Disposal: Like the dishwasher, it requires a 15-amp, 120-volt dedicated circuit due to the significant power drawn during startup.
Refrigerator: While not always mandated by code, most electricians recommend a dedicated 15- or 20-amp, 120-volt circuit to ensure consistent power and prevent tripped breakers.
Oven, Wall Oven, or Cooktop: Each typically requires its own dedicated circuit, sized according to the manufacturer’s specifications and NEC requirements.
Lighting Circuits:
Every kitchen should have at least one dedicated lighting circuit, with the NEC recommending a minimum of a 15-amp, 120-volt circuit for general lighting. More complex lighting setups, such as under-cabinet LEDs or statement pendant lights, may necessitate additional circuits or higher amperage. Importantly, the NEC now requires Arc Fault Circuit Interrupters (AFCIs) protection for most kitchen circuits, including those serving outlets, lighting, and appliances. AFCIs detect dangerous arcing faults and shut down the circuit to prevent electrical fires.
Electrical Panel Upgrade and Code Compliance:
Older electrical panels may not be equipped to handle the increased load of modern kitchen appliances, potentially leading to overloaded circuits, frequent trips, or even electrical fires. An experienced electrician can assess the kitchen's needs and determine if an upgrade to the electrical panel is necessary to meet increased demand and ensure that all circuits can safely handle the load. Kitchen remodels often require updating electrical wiring to meet local building codes and safety standards, including proper wiring, grounding, and bonding of all components.
Electrical planning is not merely about placement; it encompasses capacity, safety, and future needs. The kitchen brief must meticulously outline all desired appliances and lighting fixtures to ensure the electrical system is robust, compliant with current codes, and capable of supporting the long-term functionality of the kitchen.
V. Storage Solutions
Effective storage is a core functional requirement that directly impacts workflow, organization, and daily enjoyment in a kitchen. Maximizing storage and minimizing clutter are paramount for a truly efficient and pleasant culinary space.
To begin, homeowners should conduct a thorough inventory of their existing kitchen items, identifying what needs to be stored and recycling any unused items that contribute to clutter. Items should then be stored based on their frequency of use and their proximity to related tasks to optimize workflow.
Maximizing Storage and Minimizing Clutter
Innovative storage solutions can transform a kitchen:
Hidden Storage Tricks: These clever and stylish methods keep the kitchen clutter-free while maximizing function. Examples include pull-out shelves that transform cabinet interiors into easily accessible spaces, and corner cabinets (often called the "Bermuda Triangle of kitchen storage") that can be efficiently utilized with corner drawers or carousels.
Utilizing Vertical Space: Wall-mounted shelves or hooks can keep countertops clear and make use of often-overlooked vertical areas.
Above Cabinet Storage: The space above cabinets can be innovatively utilized for extra storage.
Vertical Storage Racks: For items like baking sheets, cutting boards, and trays that consume considerable cabinet space, installing vertical storage racks inside a cabinet or on the side of a refrigerator keeps them organized and easily accessible.
Multi-Functional Furniture: Incorporating furniture pieces like a kitchen island with built-in storage can serve multiple purposes, enhancing both workspace and organization.
Quality Hardware: Investing in smooth-running drawers and durable hinges significantly improves daily efficiency and the longevity of storage solutions.
Labeling: Clear labels can make it easier to locate and return items, especially in shared kitchens, promoting sustained organization.
Types of Cabinetry and Drawer Organizers
A wide array of specialized cabinetry and drawer organizers are available to customize storage solutions for specific needs:
Pantry Units: Systems like Blum's SPACE TOWER offer ample storage space with individual inner drawers that can be tailored to specific needs. They provide easy, all-around access to pantry items via full-extension drawers, allowing clear visibility from above. Flexible organization systems within these drawers ensure items are tidy and don't tip over, and each drawer can have a high load-bearing capacity (up to 125 pounds) for heavy items like bottles.
Roll-Out Trays/Shelves: These organizers bring the contents of cabinets directly to the user, eliminating the need to reach deep inside and making items easier to see and retrieve. They are available in various materials like wood or chrome and can be custom-designed to fit specific cabinet configurations.
Corner Cabinet Solutions: To effectively utilize the often-awkward corner cabinet space, solutions include corner drawers, carousels, Lazy Susans, and blind corner cabinet pull-out shelving, all designed to make items more accessible.
Drawer Inserts and Dividers: These are essential for internal drawer organization. Options include:
Custom Cutlery/Utility Inserts: Tailored to fit specific utensils and cookware, often with a two-tier design for increased capacity.
Knife Drawer Organizers: Improve safety by providing designated slots for knives, preventing wear and tear and making them easy to find.
Spice Tray Drawer Inserts: Offer dedicated compartments for spice jars, streamlining cooking by making spices quickly accessible.
K-Cup Drawer Inserts: Feature divided compartments for individual coffee pods, making selection easy.
Cut-To-Size Wood Utility Tray Inserts: Customizable wooden trays that fit perfectly into drawers to organize and separate items.
Drawer Peg Systems: Highly customizable, allowing users to arrange and rearrange pegs to create compartments of various sizes, optimizing space utilization.
Angled Utensil Drawers and Wood Tiered Drawer Storage Kits: Provide specialized organization for utensils and other items.
Specialized Organizers:
Pots and Pans Organizers: Vertical storage solutions that allow stacking on multiple tiers, accommodating heavy cookware and preventing clutter.
Bakeware and Storage Container Solutions: Designed to revolutionize organization for these often-cumbersome items.
Trash and Recycling Pull-Outs: Help conceal bins within easily accessible, designated areas.
Flat Item Organizers: Solutions for cutting boards, cookie sheets, cooling racks, and trays that maximize space.
Under-Sink Organizers: Transform this often-problematic area into a space with doubled storage and better organization.
Effective storage is not an afterthought but a core functional requirement that directly impacts workflow and daily enjoyment. The kitchen brief should detail specific items to be stored and preferred access methods, allowing designers to integrate tailored solutions that enhance the kitchen's long-term usability.
VI. Lighting Design
Lighting is a critical element that significantly influences both the functionality and aesthetics of a kitchen, transforming a dull, shadowy space into a vibrant, welcoming, and safe environment. A well-designed kitchen incorporates a layered lighting approach.
Layered Lighting: Ambient, Task, and Accent
Three distinct layers of lighting work in concert to illuminate a kitchen effectively:
Ambient Lighting: This foundational layer provides diffuse brightness to the entire room, offering overall illumination that allows for comfortable and safe navigation. It sets the general tone and mood of the space. Common sources include ceiling fixtures such as flush mount lights (mounted flush with the ceiling, casting light throughout the room, ideal where space is limited) and semi-flush mount lights (hanging slightly below the ceiling, offering a chandelier-like effect in rooms with lower ceilings). Recessed lighting and large lamps also contribute to ambient illumination. Kitchen ceiling fans with integrated lights can provide both ambient lighting and airflow.
Task Lighting: Designed for focused work, task lighting clears away shadows over specific areas where cooking, preparation, and cleaning tasks occur. This brighter, more concentrated light reduces eye strain and improves visibility for activities requiring precision, such as slicing, steaming, and sautéing. Key sources include under-cabinet lighting (LED pucks, light bars, or tape lights) which are highly functional and minimize intrusion from overhead lighting. Pendant lights are frequently used as task lighting over kitchen islands, sinks, and dining tables. When hanging pendants over an island, aim for 30-36 inches of space between the bottom of the pendant and the countertop, ensuring the light spread overlaps to eliminate dark shadows. Pendants are typically centered over the island without overhanging the ends, with 30-36 inches between each fixture. For a sink against a wall, a dedicated pendant should be centered 12 inches from the wall, with its bottom 30-40 inches from the countertop, adjustable for taller individuals. Chandeliers, if designed to direct light downwards, can also serve as task lighting over islands or dining tables.
Accent Lighting: This layer serves as the finishing touch, highlighting specific elements of the kitchen such as wall art, unique architectural features, or shelving. It adds depth and visual interest, making the space feel more dynamic. Popular options include track lights, wall sconces (which can also function as task lighting over a sink or counter, or as decorative accents in glass display cabinets), and even neon light decorations. Dimmers are essential for accent lighting, allowing for easy transition from functional brightness to a more relaxed ambiance.
Natural Lighting Integration
Integrating natural light is paramount, as it makes a space appear more spacious and open, providing consistent and balanced color illumination.
Sources: Kitchen windows offer large openings for sunshine while protecting from outdoor elements. Exterior doors can add both functionality and natural light. Skylights, positioned in the ceiling, are excellent for catching sunlight evenly throughout the day and offer views of the night sky. For kitchens without direct roof access, light tunnels (reflective tubes) can direct diffused sunlight indoors, providing ambient illumination.
Tips for Maximizing Natural Light: To optimize natural light, homeowners should avoid heavy curtains and instead opt for blinds, sheer curtains, or light-colored shades that provide privacy while still allowing light to filter through. In kitchens that receive minimal natural light, strategically placed mirrors can effectively increase the intensity of artificial light by reflecting it throughout the room.
Color Temperature and Smart Lighting
The color temperature of light, measured in Kelvin (K), significantly impacts the mood and functionality of the kitchen:
Warm White (2700-3000K): Ideal for creating a cozy, inviting atmosphere, particularly in dining areas or for under-cabinet lighting near work surfaces.
Neutral White (3500-4000K): Considered optimal for task lighting due to its balanced output and moderate brightness, providing clear visibility without harshness.
Cool White (4000K-5000K): Best for creating a functional workspace, as it illuminates tasks effectively and enhances focus. This range is often used in commercial kitchens for its clarity.
Smart lighting solutions, such as dimmers, allow for easy transition between different lighting moods, from bright task illumination during cooking to a softer ambiance for dining or relaxing. Voice-controlled lighting features can also enhance convenience and accessibility, aligning with universal design principles.
Lighting plays a dual role in kitchen design, serving both functional and aesthetic purposes. It impacts the mood, usability, and safety of the space. A well-crafted kitchen brief considers how light will be utilized throughout the day and for various activities, meticulously integrating natural and artificial sources to create a truly balanced and inviting environment.
VII. Accessibility and Universal Design
Incorporating principles of universal design into a kitchen remodel is a forward-thinking approach that enhances usability for everyone, regardless of age, ability, or mobility. This approach ensures that the kitchen remains functional and comfortable for all users throughout their lifetime, broadening its appeal and future-proofing the space.
Principles of Universal Design in Kitchens
The 7 Principles of Universal Design provide a comprehensive framework for creating an accessible and inclusive kitchen:
Equitable Use: This principle ensures the design is useful and marketable to people with diverse abilities. In a kitchen context, this translates to features like drawers and cabinets that are within easy reach and simple to operate, possibly incorporating no-slam hinges or drawers that can be closed with an elbow. It also involves designing varied counter heights, including lower surfaces accessible to individuals using wheelchairs, and selecting appliances like refrigerators with low-set water and ice dispensers.
Flexibility in Use: The design should accommodate a wide range of individual preferences and abilities. This can be achieved by designing kitchen areas for multiple purposes, such as lower countertops that can double as eat-in seating. Appliances should be usable by both left-handed and right-handed individuals. A flexible kitchen layout is crucial, featuring different entry and exit routes and ample room for navigation with mobility aids like wheelchairs, crutches, or canes. A wheeled kitchen island that can be easily moved when necessary is a practical solution.
Simple & Intuitive Use: The design should be easy to understand, regardless of the user’s experience, knowledge, language skills, or current concentration level. This extends beyond physical differences to cognitive needs. Handles should be easily reachable and clearly indicate whether pushing or pulling is required. Ideally, kitchen features should be intuitive to use. Transparent universal design kitchen cabinets can allow users to see contents without opening them, simplifying access and reducing effort.
Perceptible Information: This principle focuses on communicating necessary information effectively to the user, irrespective of ambient conditions or sensory abilities. In kitchens, this is particularly useful for appliances like stoves and faucets. Examples include clearly visible indicators such as "hot" and "cold" in bright red and blue colors for temperature control, and stovetop burners that glow red when hot to promote safety and clarity. Symbols, braille, and voice-controlled features can also be used to accommodate language barriers or visual impairments.
Tolerance for Error: The design should minimize hazards and the adverse consequences of accidental or unintended actions. Even with careful design, kitchens can pose risks. This principle involves implementing fail-safe measures and design features that encourage caution. For instance, knives can be stored separately from other silverware in a container that requires manual opening. Smoke detectors should be strategically placed near stovetops and ovens for quick fire detection and immediate alerts.
Low Physical Effort: The design should allow for efficient and comfortable use with a minimum of fatigue. In a universal-design kitchen, this means minimizing the physical effort required of users. Hardware for drawers, cabinets, and appliances should be simple and comfortable to use, regardless of physical strength. For entry and pantry doors, considering lever handles or swinging doors that do not latch can reduce effort. Dimmer switches with larger sliding controls, not requiring fine motor skills, can also increase ease of use for lighting.
Size & Space for Approach & Use: Appropriate size and space must be provided for approach, reach, manipulation, and use, regardless of the user’s body size, posture, or mobility. A universal-design kitchen should allow easy passage and movement for everyone, including those in wheelchairs. Tight corners should be limited in favor of smooth pathways around appliances and islands.
Incorporating universal design principles from the outset is not merely about accommodating specific needs but about enhancing the usability and comfort of the kitchen for everyone across a lifetime. This approach future-proofs the kitchen, broadens its appeal, and ensures it remains a welcoming and functional space for all who use it.
VIII. Budgeting and Project Timeline
A realistic budget and a well-understood project timeline are crucial for a successful kitchen renovation. Homeowners often underestimate the time and financial commitment involved, particularly during the planning and design phases.
Budget Allocation and Cost Factors
The National Kitchen and Bath Association (NKBA) recommends budgeting 15-20% of the value of a home for a kitchen remodel. For example, a $250,000 home would have a recommended kitchen remodel budget of $37,000-$50,000, while a $500,000 home might allocate $75,000-$100,000. It is also strongly advised to set aside an additional 10-20% of the total budget as a contingency fund to cover unexpected expenses or unforeseen issues that may arise during the renovation process.
The national average cost to remodel a kitchen is approximately $26,268, though this figure can range significantly from $14,000 to over $50,000, or even $32,574 to $77,939 for a medium-large kitchen, depending on factors such as location, home value, product selection, square footage, and the overall project scope. A complete kitchen gut remodel involving structural changes and relocation of utilities will naturally incur higher costs than simply replacing appliances and cabinets within the existing layout.
The NKBA provides a general breakdown of how a kitchen remodeling budget is typically allocated:
Cabinetry and Hardware: 29%. This is often the most expensive component of any kitchen remodel due to its central role, durability requirements, and the desire for updated styles and features.
Installation: 17%.
Appliances and Ventilation: 14%.
Countertops: 10-11%.
Lighting & Electrical: 10%.
Plumbing: 6%.
Flooring: 5-7%.
Backsplash: 5%.
Walls and Ceilings: 5%.
Design Fees: 4%.
Doors and Windows: 4%.
Faucets and Plumbing: 4%.
Miscellaneous: 1-4%.
Kitchen remodels can offer a significant return on investment, particularly for resale value. In 2022, an $80,000 kitchen remodel recouped an average of 56% of its cost upon home sale, while a smaller $28,000 remodel saw an average return of 71%. Strategies to reduce costs include shopping smartly for materials (e.g., during sales, at discount outlets), avoiding major layout changes that necessitate moving plumbing or electrical lines, considering DIY installation for certain components, utilizing free professional design services, and acting as one's own general contractor.
Project Timelines and Potential Delays
The average kitchen remodel typically takes between 3 to 6 months to complete. However, the actual duration is heavily dependent on the project's scope. A minor refresh, such as simply replacing countertops or appliances, can be completed in a few weeks, with an appliance swap potentially taking only one to two weeks if items are readily available.
Key phases and their typical durations include:
Planning and Design: This crucial initial phase typically requires 2 to 4 weeks, encompassing defining the vision, setting a budget, choosing materials, and obtaining necessary permits. It is important to note that this phase alone can sometimes extend up to 3 months.
Demolition: The removal of the existing kitchen to prepare for the new design usually takes 1 to 2 weeks.
Construction: This phase involves the core work and typically spans 6 to 10 weeks. It includes rough-in for plumbing and electrical (2 weeks after demolition), inspections (1 week after rough-in), flooring installation (1 week after inspections), cabinet installation (1 week after flooring), and countertop and appliance installation (1 week after cabinets).
Final Touches and Inspection: This phase, focusing on finishing details like painting, backsplash installation, and final inspections, typically takes 1 to 2 weeks.
Several common factors can lead to project delays:
Permitting Delays: Unforeseen holdups in obtaining necessary permits can significantly impact the project's start date.
Unexpected Findings: During demolition, unexpected issues such as asbestos, mold, or structural problems can be uncovered, requiring additional time and budget for remediation.
Material Availability: Material backorders are a frequent cause of delays, potentially adding 2 to 6 weeks to the timeline. Contractor scheduling can also be a factor.
Inspection Failures: If initial inspections fail due to code compliance issues, additional time (typically 1-2 weeks) will be needed for corrections and re-inspection.
Customization: Opting for custom cabinetry, for example, will generally extend the timeline compared to using readily available stock cabinets.
The importance of realistic planning for both budget and timeline cannot be overstated. These aspects are frequently underestimated by homeowners. A detailed kitchen brief, which includes robust contingency planning and an understanding of potential delays, is crucial for managing expectations effectively and ensuring the project's successful completion.
IX. Conclusion
The process of creating a comprehensive kitchen brief is far more than a mere checklist; it is a dynamic and iterative journey that forms the bedrock of a successful kitchen transformation. This document serves as a living blueprint, continuously refined as homeowners delve deeper into their needs, preferences, and the technical realities of design and construction. It is, at its heart, a collaborative tool that bridges the gap between a client's aspirational vision and the practical execution by design professionals.
A truly exceptional kitchen emerges from a holistic approach where functionality, aesthetics, and technical compliance are given equal weight. The intricate dance between optimizing workflow through thoughtful layouts and zoning, selecting materials that balance durability with desired style, integrating cutting-edge appliances, ensuring robust plumbing and electrical infrastructure, and designing layered lighting, all contribute to a cohesive and high-performing space. Furthermore, the proactive integration of universal design principles ensures that the kitchen remains accessible and comfortable for all users throughout their lives, making it a truly future-proof investment.
Ultimately, the value of a meticulously crafted kitchen brief lies in its ability to minimize miscommunication, mitigate unforeseen challenges, and foster a seamless partnership between homeowners and their design and build team. It empowers clients to articulate their unique story of how the kitchen will be lived in, enabling professionals to translate that narrative into a tangible, high-performing, and aesthetically resonant culinary environment. The commitment to this detailed preparatory phase is the most impactful step towards realizing a dream kitchen that not only looks exquisite but functions flawlessly for years to come.